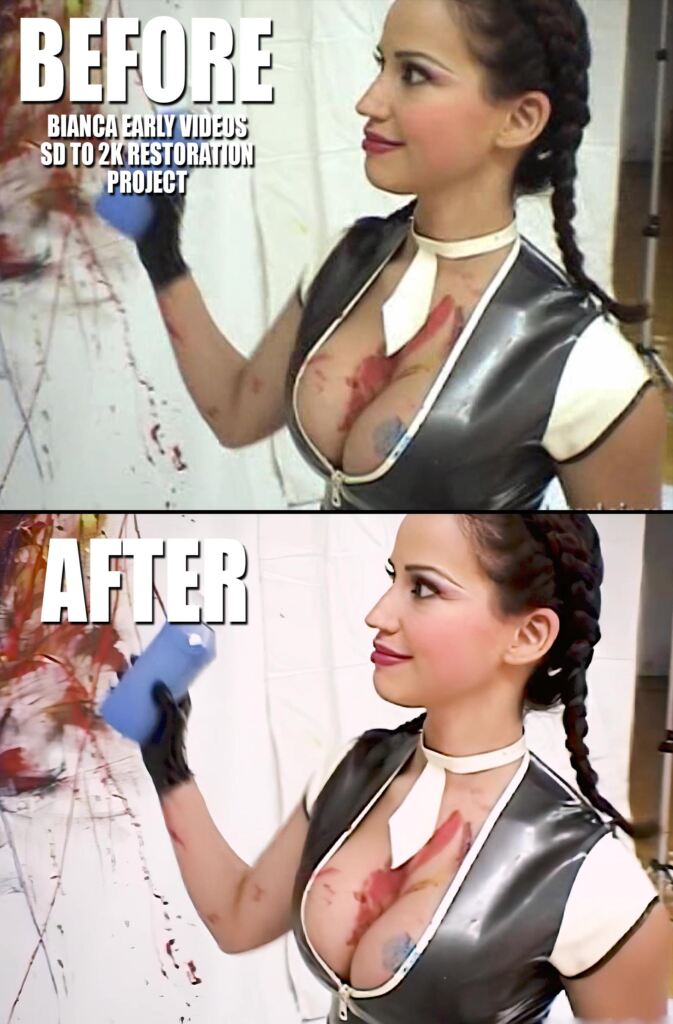
BIANCA’S EARLY VIDEOS RESTORATION PROJECT
Early in my career, it was important for me and Martin to document our photo shoots with video. For me posing for the camera was difficult at first, and video was an even higher challenge. But at least I could dance and soon I found myself taking pleasure in acting out for video, like the Bianca Reloaded clip inspired from The Matrix.
A lot of those early videos were published in much lower quality than they were filmed. Martin will explain below, but in short we needed to compress the clips a lot to accommodate for low server storage space, and slower internet speed. The technologies evolved at a rapid pace in the years 2000s, and eventually HD became the norm online with better quality.
Recently Martin decided to Restore some of those early clips to the best possible visual quality. I’ll let him explain the process below. I hope you enjoy these restored early videos that will pop up from time to time on my site! Don’t hesitate to comment on those Restoration Posts your requests for future clips to be restored.
xxx
– Bianca
CLICK HERE
TO VIEW ALL
RESTORATION POSTS
MARTIN EXPLAINS THE PROCESS:
BIANCA’s EARLY VIDEOS RESTORATION PROJECT, EXPLAINED (2022):
I bought my first video camera with my own money at age 16 in the late 80s. It was a VHS camera, and I paid $750 for it which was a fortune for me working at $3.25/hr. I upgraded to a Hi8 Tape Camera in the early 90s while studying cinema at university. When I started shooting with Bianca in the late 90s, I bought a DV Tape Camera and used it to shoot early clips with her. I was always interested in publishing some clips on her website, and when we moved to the LOFT in 2001, I shot as much as I could to document the shoots. I loved editing them in Adobe Premiere which was by then a refined editing platform. Publishing the clips on the website on the other hand was always a challenge. There was no compression standard, no video hosting platforms, server storage was costly and many people had slow internet connections. This resulted with me choosing lower resolutions and higher compression to create low file size.
I was always interested at restoring the quality of Bianca’s early videos, and for that I needed the original Master Files. However, over the years with different work station computer upgrades, hard disk swaps, poor early file archiving structure on my part, many of the original uncompressed Master Edits of the early Bianca videos have been lost. Many copies that remain are the ones that are either already highly compressed on Bianca’s website, or some obscure archives I found hidden on old hard drives – and even at that those are quite compressed. But recently a new tool surfaced online that would change the whole game.
There’s a say in image production: Shit In, Shit Out. Meaning, if your image source is bad to start with, there’s not much you can do to improve it. Due to the state of those early clips, I never thought I could do much to restore them to a better quality. To the rescue came the technologies of Topaz Video Enhance AI. This is quite a spectacular video tool that, as explained on Topaz website, “uses information from multiple frames to achieve high-end results for video upscaling, denoising, deinterlacing, and restoration“. Somehow Topaz Video Enhance does nothing short of miracles with many very low resolution videos that have been highly compressed. It’s not perfect, and sometimes it produces strange results if the manual adjustments are not done right, but it is pretty spectacular when things work out the way you hope. It not only restores the visuals, it allows to upscale the resolution as well.
I decided to revisit early clips and restore them. It’s a job that requires time and patience. I do it between updates, between photo shoots, and overall site maintenance. Sometimes I find more time, sometimes less. Who knows the frequency they will appear on the site, however I’m motivated to give them the respect they deserve and it’s my pleasure to do so. Some members here have been on this journey with us since they beginning. You guys are true number one fans, and we have no words to express our gratitude for your contribution to our career. This restoration project is a small token of my appreciation in return to you.
I added more technical details on this project below for those who are curious of the technicalities that surround this restoration process.
Feel free to leave your next restoration requests on each of those restoration posts comments. I take them into consideration for the next line-up.
– Martin
VIDEO RECORDING TOOLS:
Video tools like Cameras and Editing Platforms were undergoing a revolution in the 90s and 2000s. Everything was moving quite fast. In the 90s, everything was recorded on standard analog tape video recording, and it took forever to transfer those tapes to a computer just so we could try and edit the videos on crude editing softwares (think Adobe Premiere version 1.0).
In the late 90s to early 2000s technology moved to digital tape recording. That was an improvement as the visual quality of the image was better, and also transferring the video to a computer was direct digital data, so no loss of image quality during the transfer. However, the transfer was still done from a tape, in real time of the actual recordings, and that took forever.
Early 200os saw direct digital video recording, we could record digital video directly on digital cards. Transfer was much faster to a computer, and by then Editing Softwares had improved a lot.
RESOLUTIONS:
Standard Definition (SD) was the standard resolution for a very long time, which can be measured in pixel resolution of 630×480 and 720×480 (a ratio of 4:3). It’s only in the mid 2000’s that we started to see High Definition (HD or FHD – Full HD) appear as a new resolution, which was quite the improvement in pixels at 1920×1080 (16:9 ratio , that’s all TV screens today). If we are to be factual, the first HD recording cameras were offering a resolution of 1440×1080, which is a 4:3 ratio, but the recording process would record a wider ratio (16:9), squish it horizontally to fit the 4:3 ratio, then in post process during viewing or editing it would stretch back the horizontal resolution to a 16:9 ratio. This process is called ANAMORPHIC capture. We filmed the two docudramas BIANCA BEAUCHAMP ALL ACCESS with digital tape cameras using this anamorphic process. True HD (1920×1080) became a standard only in the late 2000s. 4K RESOLUTION was invented in early 2000s but was factually really introduced to the mainstream in the early 2010s (2013). 4K has a resolution of 4096×2160 pixels, but many TVs offer 4K as UHD – Ultra HD, a resolution of 3840×2160. Most TVs today are sold with a 4K or UHD resolutions. While TVs were slowly making their way from HD to 4K, many TVs were manufactured with technologies allowing 2K resolution(2048×1080), which was kind of an in-betweener from HD to 4K.
CHART:
| Resolution | Pixels |
| Standard Definition (SD) | 640 x 480 pixels |
| 720 / HD | 1280×720 pixels |
| 1080 / Full HD / FHD | 19201080 pixels |
| 2K | 2048×1080 pixels |
| 1440p / QHD / QuadHD / WQHD | 2560×1440 pixels |
| 2160p / UHD | 3840×2160 pixels |
| 4K | 4096×2160 pixels |
| 5K | 5120×2880 pixels |
| 8K / 8K UHD | 7680×4320 pixels |
FUN FACT: a VCR (VHS) tape had a resolution of 320×240 pixels.
VHS was the mainstream VIDEO format until the mid 90s! True Story.
A DVD upgraded that resolution to 720×480, SD dedinition! WOW!
It’s easy to get lost in all those resolutions. It gets even more confusing when manufacturers use their own terminologies and people use other terms (think HD, where for most people it means 1920×1080, but manufacturers use HD for 1280×720 resolutions and FHD for 1920×1080).
But basically, what is the most important thing to understand is that THE MORE PIXELS during a recording, THE MORE VISUAL INFORMATION is recorded, resulting in an IMAGE WITH MORE DETAILS. More details allows us to blow up the image on larger screens, and still feel that the image is pleasing to the eye. The lower the resolution, when blown up to a large screen, the more it appears to be pixelated, or grainy.
VIDEO COMPRESSION, A BALANCING ACT:
When you render a video to be published on the web, the clip goes through an encoding process. This compression is used to lower the digital size of the file, so that it can be delivered to your devices faster. The higher the compression, the lower the file size, but also the more visual degradation on the image. When the compression is too high, we see a lot of blocks appear on the image, and visual detail is also lost. The lower the compression, the bigger the file size and the better the image quality.
INTERNET made it’s way in people’s home in 1995. By the end of the 90s, most people who accessed the internet did it on DIAL-UP MODEMS, a terribly SLOW internet speed. Most computer screens had a resolution of 800×600 pixels, which was considered a high resolution compared to the TVs in your Living Room (720×480).
VIDEOS published on the WEB all the way up to the mid 2000s were mostly uploaded in VERY COMPRESSED and LOW RESOLUTION to make the file even smaller in order to accommodate for low speed internet access.
YOUTUBE, THE VIDEO REVOLUTION (2005):
Youtube was only created in 2005. People finally had a platform to upload their videos to. Most content uplaoded to youtube was still in quite low resolution, but people started to use less compression because they didn’t have to worry about hosting big files. Also, Youtube was taking care of creating multiple compressions and resolutions of the same clip to deliver the content to available internet connections. In the late 2000s High Speed Internet because mainstream, and with HD and FHD resolutions being more popular, the visual content quality of videos improved greatly on the platform, and everywhere else alike online.


